

How To Dramatize Clouds In Photoshop Elements 19
- Photoshop Elements User Guide
- Introduction to Photoshop Elements
- What's new in Photoshop Elements
- Organisation requirements | Photoshop Elements
- Workspace basics
- Guided mode
- Making photo projects
- Workspace and surroundings
- Become to know the Habitation screen
- Workspace nuts
- Tools
- Panels and bins
- Open files
- Rulers, grids, and guides
- Enhanced Quick Manner
- File information
- Presets and libraries
- Multitouch support
- Scratch disks, plugâ€'ins, and application updates
- Undo, redo, and cancel actions
- Viewing images
- Using Windows 7 features
- Fixing and enhancing photos
- Resize images
- Cropping
- Process camera raw prototype files
- Add together blur, replace colors, and clone image areas
- Accommodate shadows and light
- Retouch and correct photos
- Sharpen photos
- Transforming
- Auto Smart Tone
- Recomposing
- Using actions to process photos
- Photomerge Compose
- Create a panorama
- Adding shapes and text
- Add text
- Edit text
- Create shapes
- Editing shapes
- Painting overview
- Painting tools
- Set up up brushes
- Patterns
- Fills and strokes
- Gradients
- Work with Asian type
- Guided edits, furnishings, and filters
- Guided manner
- Filters
- Guided mode Photomerge edits
- Guided mode Bones edits
- Adjustment filters
- Effects
- Guided mode Fun edits
- Guided mode Special edits
- Artistic filters
- Guided way Color edits
- Guided mode Blackness & White edits
- Blur filters
- Brush Stroke filters
- Misconstrue filters
- Other filters
- Noise filters
- Return filters
- Sketch filters
- Stylize filters
- Texture filters
- Working with colors
- Understanding color
- Set up color direction
- Color and tonal correction basics
- Choose colors
- Arrange color, saturation, and hue
- Gear up colour casts
- Using image modes and color tables
- Colour and camera raw
- Working with selections
- Make selections in Photoshop Elements
- Saving selections
- Modifying selections
- Move and copy selections
- Edit and refine selections
- Smoothen pick edges with anti-aliasing and feathering
- Working with layers
- Create layers
- Edit layers
- Re-create and arrange layers
- Adjustment and fill layers
- Clipping masks
- Layer masks
- Layer styles
- Opacity and blending modes
- Creating photo projects
- Projection basics
- Making photo projects
- Editing photo projects
- Saving, printing, and sharing photos
- Save images
- Printing photos
- Share photos online
- Optimizing images
- Optimizing images for the JPEG format
- Dithering in web images
- Guided Edits - Share panel
- Previewing web images
- Apply transparency and mattes
- Optimizing images for the GIF or PNG-8 format
- Optimizing images for the PNG-24 format
- Keyboard shortcuts
- Keys for selecting tools
- Keys for selecting and moving objects
- Keys for the Layers console
- Keys for showing or hiding panels (expert mode)
- Keys for painting and brushes
- Keys for using text
- Keys for the Liquify filter
- Keys for transforming selections
- Keys for the Color Swatches panel
- Keys for the Camera Raw dialog box
- Keys for the Filter Gallery
- Keys for using blending modes
- Keys for viewing images (expertmode)
The Guided style provides you with guided edits - a wizard-similar interface to accomplish certain predefined effects. Each guided edit has an associated prototype. As y'all move the mouse horizontally over the image, the portion to the left of the slider displays the image before the outcome is applied. The portion to the right of the slider displays the epitome later the effect is applied.
Perfect Landscape guided edit
Perfect Mural guided edit enables you to easily supercede skies, remove brume, and erase unwanted objects to create epic outdoor scenes. You lot are sure to create the perfect hazard photo every time.
Sentinel the video >


Supercede Background guided edit
The Supercede Background guided edit lets you lot supersede the background of your photos with other photos, colors, and included groundwork presets. If you want to use your own photos as background images, you tin import them and employ them as a background.
-
Do ane of the following:
- Open a photo in Photoshop Elements.
- Select a photograph from the Photo Bin.
-
SelectGuided>Special Edits >Supplant Background.
-
Select one of the following tools and create a selection of the master discipline of your photograph:
- Auto: Use the Auto Pick tool to automatically create a pick when yous draw a shape around the object y'all want to select. For more than information, meet Use the Machine Selection tool.
- Quick: Apply the Quick Selection tool to brand a choice based on color and texture similarity when you click or click-elevate the object you want to select. For more information, see Use the Quick Choice tool.
- Brush: Use the Option Brush tool to paint over the object yous want to select. For more information, come across Use the Pick Brush tool.
- Refine: Utilise the Refine Selection Brush tool to add or remove areas to and from a pick by automatically detecting the edges. For more information, see Edit and refine selections.
-
Practise ane of the post-obit to choose a background:
- Click Import a photo to add your photo as background.
- Click Preset to add one of the background preset as the groundwork.
- Click None to remove the background.
- Click Colour to add a color as the background.
-
(Optional) Click theMotility Tool and drag the foreground or the groundwork if necessary.
-
Click theRefine Edge Brush and paint over the foreground to refine the edges of the foreground. Use the post-obit options to adjust the settings of the brush:
- Add: Use this option to add together more area to the edges of the foreground.
- Subtract: Use this option to subtract area from the edges of the foreground.
- Size: Increases or decreases the brush size.
- Opacity: Increases or decreases the opacity of the brush stroke.
-
(Optional) Click Machine Match Colour Tone to match the colour tone of the subject with the background.
-
After y'all become the desired result, click Next to cull how y'all would like to continue:
- Save - Save/Save Every bit: Preserve the newly-created image in any of the available formats.
- Continue editing- In Quick/In Skilful: Cull where you lot would similar to continue working on the image - in Quick mode or Expert mode.
- Share - Flickr/Twitter: You tin upload your photograph online through one of the social or sharing services available in Photoshop Elements.
Depth of Field guided edit
The Depth of Field effect allows you to focus on selected areas of the image by blurring out the rest of the image.
Elementary method
In this method, a copy of the background layer is created and a uniform blur applied to information technology. Cull selected areas that you lot desire to focus on. Yous can customize the degree of blur applied to the rest of the image.
-
In Guided manner, from the Special Edits section, click Depth of Field.
-
Click Add Blur. A uniform blur appears across the prototype.
-
To ascertain areas of focus, click Add Focus Surface area and elevate the cursor across areas of the image you desire to focus on.
-
To customize the blur for the residual of the image, drag the Blur slider until you achieve the desired blur effect.
-
After you lot go the desired consequence, click Next to choose how y'all would like to continue:
- Save - Save / Save As: Preserve the newly-created image in any of the available formats.
- Go on editing- In Quick / In Expert: Choose where yous would like to proceed working on the paradigm - in Quick mode or Expert manner.
- Share- Flickr / Twitter: Choose to place your image online through one of the social or sharing services available in Photoshop Elements.
Custom method
In this method, yous choose the objects you want to focus on using the quick selection tool. The blur is applied to unselected areas of the prototype. Yous tin can customize the degree of blur applied to the rest of the paradigm.
-
In Guided style, from the Special Edits section, click Depth of Field.
-
Click the Quick Option tool and movement over areas of the paradigm yous want to focus on.
-
Click Add Blur. A compatible blur is practical to the rest of the image.
-
To customize the blur for the residual of the image, drag the Blur slider until yous achieve the desired blur outcome.
-
After you lot become the desired result, click Next to cull how y'all would similar to continue:
- Save - Salve / Save Every bit: Preserve the newly-created image in any of the available formats.
- Go along editing- In Quick / In Good: Choose where you would like to continue working on the image - in Quick way or Expert fashion.
- Share- Flickr / Twitter: Cull to place your image online through one of the social or sharing services available in Photoshop Elements.
Extend Background guided edit
Introduced in Photoshop Elements 2022
You can useExtend Background guided edit to extend the background of an prototype by cloning the image surroundings using Autofill or past expanding them using Extend tool. Either mode, the primary object of the epitome remains undistorted.
 and image with Extended Background (right)")
To use this feature in Photoshop Elements, follow these steps:
-
Go to File > Open to open an epitome in Photoshop Elements
-
In Guided mode, select Special Edits and click Extend Background
-
Practice the following to apply adjustments:
- Cull the canvas size for your epitome
- Cull the sides you want to extend
- Use Autofill or Extend options to fill the expanded area
- Use Spot Healing Brush for small-scale fixes and Clone Stamp tool for major fixes
-
After you get the desired result, click Next to choose how you would similar to proceed:
- Save - Preserve the newly-created epitome in any of the available formats.
- Proceed editing - Choose where you would like to continue working on the epitome - in Quick mode or Expert mode.
- Share - Choose to place your image online through i of the social or sharing services available in Photoshop Elements.
Frame Creator guided edit
You can at present create a photo frame using any photograph that you take in your library. Use the Frame Creator guided edit to rapidly create a custom frame to outline your photos.
-
Open a photo in Photoshop Elements.
-
Click Guided > Special > Frame Creator.
-
Select an area on the photo where other photos can exist placed by using one of the following selection tools:
- Quick. Hands select large areas by dragging the tool beyond the photo.
- Castor. Paint over areas of the photo where photos tin can be inserted.
- Magic Wand. Click areas of the photo where photos can exist inserted.
- Polygon Lasso. Click the corners of the areas where a photo can be inserted.
-
Click Create Frame to create the frame. The office of the photo selected in the previous stride is subtracted from the original photo to create the frame.
-
Click Save Frame. Provide a meaningful name for your new frame.
-
Click Keep in Expert to make further modifications to the frame, or to start using it.
All frames you created are available in Expert mode > Graphics panel. Utilise the Filters By Type > Frames > My Frames to filter the frames you lot created.
-
Click or drag a photo to place it in the frame.

Add a photograph to the frame. Y'all tin share your custom frames with others from the Graphics panel in the Practiced mode. Employ the filters By Blazon > Frames > My Frames. Right-click the frame that you want to share and select Reveal in Finder.
Not only tin can you at present create fun, customized frames that speak your story, you can also import frames that other Elements users take created.
Import a frame in a few simple steps:
-
In Photoshop Elements, switch to Expert fashion.
-
Click Graphics, and then from the fly-out menu, click Add Frame.

-
Select the PSD file that represents the frame you lot are importing, and then click Load.
-
In Proficient style, click Graphics.
-
From the drop-downs available in the right panel, choose By Blazon > Frames > My Frames.
The custom frames created using Frame Creator Guided Edit tin can be restored and reused on another device or with a different version of Photoshop Elements. To do this, take a backup of these frames before uninstalling Photoshop Elements, by copying your custom frames from the post-obit location into a dissimilar folder:
/Applications/Adobe Photoshop Elements 2021/Contents/MacOS/Adobe Photoshop Elements 2021 Editor/Contents/Application Information/Photoshop Elements/19.0/Photograph Creations
Orton Effect guided effect
The Orton event provides a dreamy upshot to your photographs.
-
In Guided mode, from the Special Edits department, click Orton Effect.
-
In the Create Orton Result panel, click Add Orton Effect.
-
Edit the post-obit parameters according to your requirements:
Increment Blur
Specifies the amount of mistiness in the out-of-focus layer.
Increment Noise
Adds noise to the blurred layer.
Utilise Brightness
Increases brightness of the blurred layer.
-
After yous become the desired result, click Next to choose how you would like to go on:
- Relieve - Relieve / Save As: Preserve the newly-created image in whatsoever of the bachelor formats.
- Go along editing- In Quick / In Expert: Choose where you would similar to continue working on the image - in Quick mode or Proficient manner.
- Share- Flickr / Twitter: Choose to identify your image online through one of the social or sharing services available in Photoshop Elements.
Use the zoom option in the editor to place how the effect is practical to different areas of the photograph.
Perfect Pet guided edit
Introduced in Photoshop Elements 2022
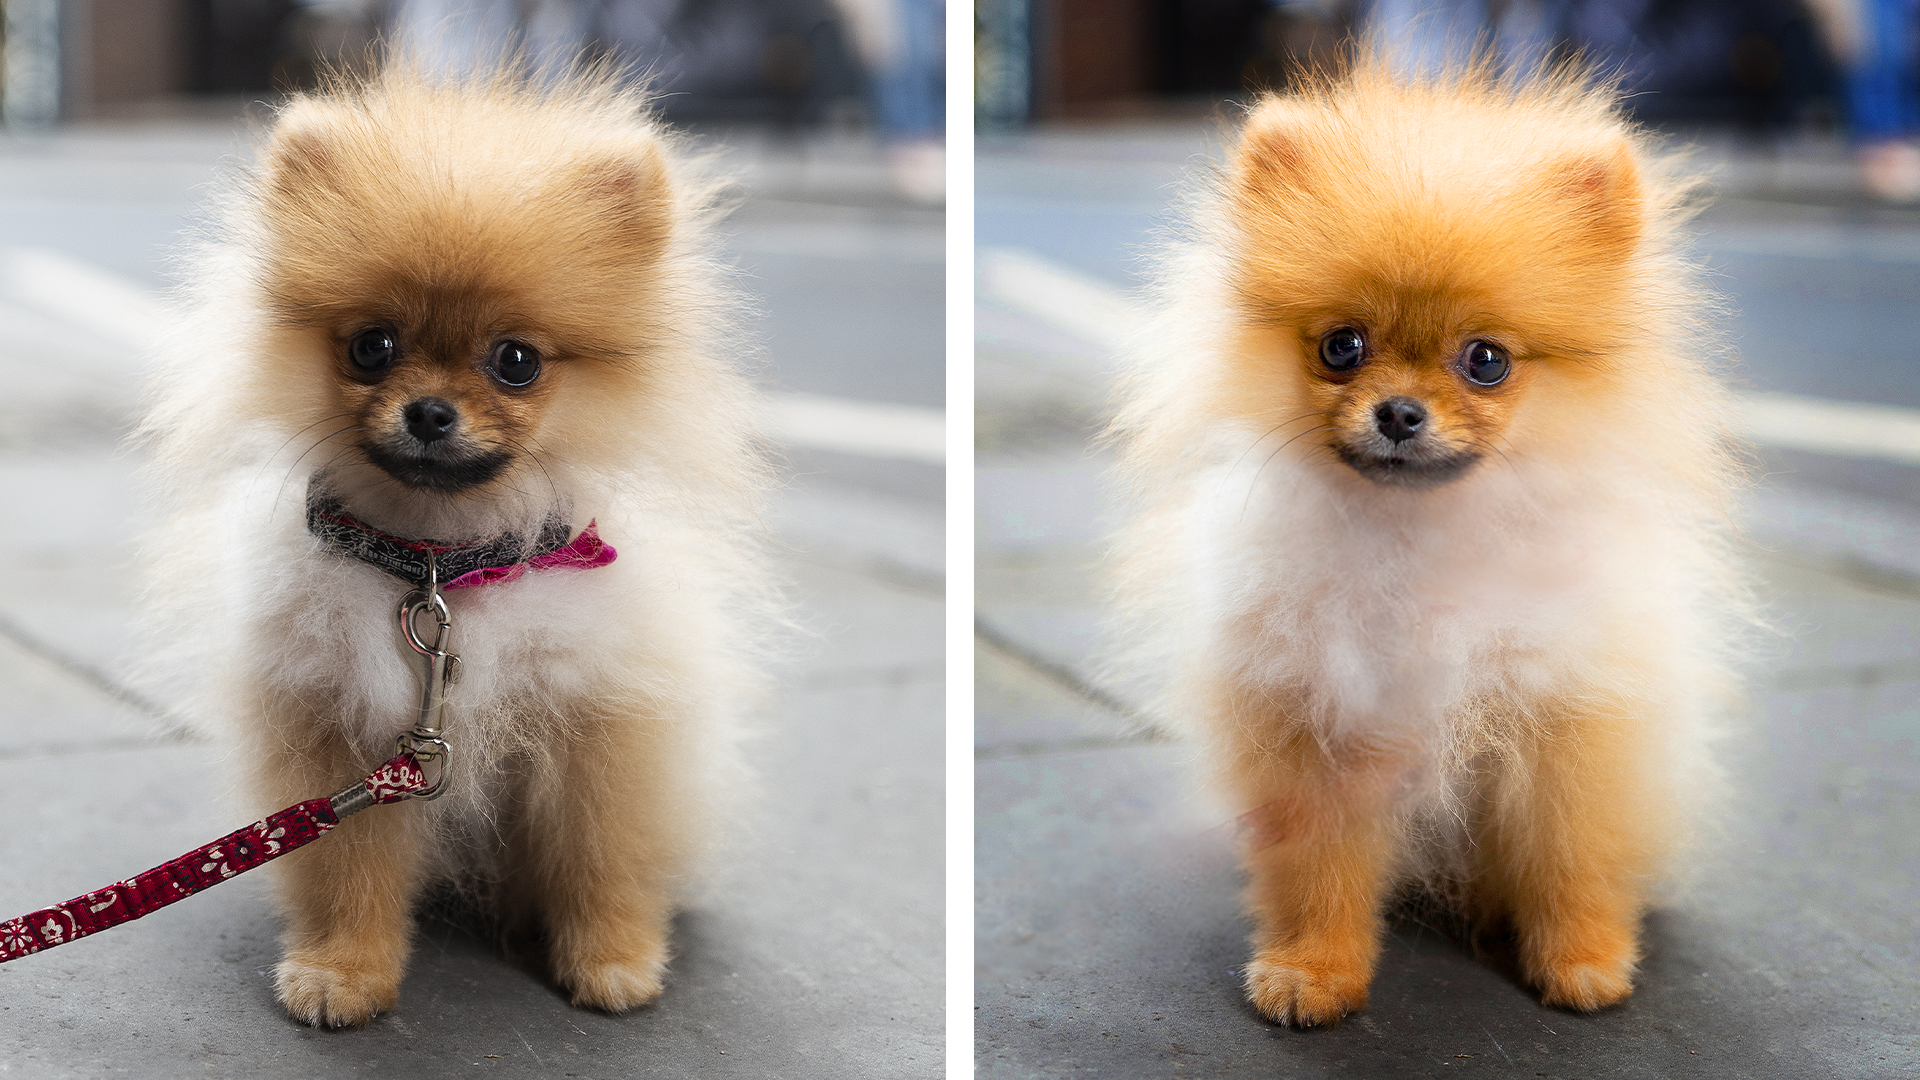
Perfect Pet Guided Edit allows yous to enhance your pet photos with tools that let you do bones crop, remove eye glare, remove small distractions, and add together some effects. It also allows you to apply adjustments selectively on subject and groundwork.
To use Perfect Pet Guided edit in Photoshop Elements, follow these steps:
-
In Photoshop Elements editor, click File > Open to open an paradigm that yous want to edit.
-
In Guided mode, from the Special Edits section, click Perfect Pet.
-
Apply the following adjustments as per your requirements:
- Select Crop/Straighten to frame your image. For more than information on cropping, run across Cropping. For more than on straightening an image, run into Straighten an image
- Use Remove Dirt and Spots, Remove Collar & Leash, Gear up Pet Middle options to remove unwanted objects and eye glare from your prototype
- Select the subject or the background to heighten and alter
- Fine-tune the epitome using Lighting & Enhance options. For more on lightening and darkening an image, meet Adjust shadows and light
- Add additional effects
-
After you get the desired result, click Next to choose how you would like to proceed:
- Save - Preserve the newly created paradigm in any of the bachelor formats
- Continue Editing - Choose where you would like to continue working on the paradigm - in Quick style or Practiced mode
- Share - Choose to place your image online through one of the social or sharing services available in Photoshop Elements
Recompose guided edit
For more than data on the features used in the Recompose Photo Guided Edit, see Recomposing.
Perfect Portrait guided edit
In Guided Edit, create a perfect portrait past removing blemishes and enhancing various parts of the image with easy-to-utilize tools.
-
In Guided mode, from the Special Edits department, click Perfect Portrait.
-
Enhance the texture of the skin.
-
Click the Polish Peel button to apply smoothness to skin. Yous can move the Strength slider to increase or decrease the smoothness consequence.
-
Click Increment Contrast to add clarity.
-
-
-
Click Remove Blemishes to fix pocket-size flaws.
-
Click Whiten Teeth to brighten your smile.
-
Click Brighten Eyes to brighten the eyes.
-
-
-
Click Add Glow. Suit the sliders until you achieve the desired results.
-
Click Slim down to make the selected face announced slimmer.
Each click intensifies the upshot.
-
-
After you go the desired result, click Adjacent to choose how you would similar to proceed:
- Save - Save / Salve As: Preserve the newly-created image in whatsoever of the available formats.
- Go on editing- In Quick / In Expert: Choose where you would like to continue working on the prototype - in Quick mode or Proficient mode.
- Share- Flickr / Twitter: Choose to identify your image online through 1 of the social or sharing services bachelor in Photoshop Elements.
Restore Old Photo guided edit
Photographs, over time, may get damaged due to the effects of the weather, quality of paper, or neglect. Later digitization of a damaged photo, various tools tin be used to restore the epitome to remove cracks, discoloration, smudges, or other imperfections. The Restore Old Photo guided edit takes you lot through a step-by-stride procedure, and presents you with all the tools you need to restore an paradigm in i workflow.
-
Use the Ingather (C) tool and the rotate cropping frame to decide on the section of the photograph that you would like to restore.
-
Use the Spot Healing tool to repair smaller spots, lines, and tears.
-
Use the Healing Brush tool to heal a damaged part of an image with an undamaged section of the same photograph. Press Alt + Click a suitable part of the image, and and then elevate the portion to the damaged part of the image.
-
Use the Clone Stamp tool to copy one part of an image to another. To repair portions, press Alt + click the source expanse, and then drag on the damaged expanse.
-
Utilize the Blur tool to smooth the areas where in that location is undesirable granulation of the photo.
-
Use the Dust Remover tool to heal smaller lines, dust impressions, and other imperfections.
-
Use the available buttons to apply corrections related to levels, contrast, and colour. You can also convert the photograph into a blackness and white epitome in a single click.
-
Apply the Sharpen tool to raise the clarity of the final output.
-
After you get the desired result, click Side by side to choose how y'all would like to proceed:
- Save - Save / Save Every bit: Preserve the newly-created image in any of the available formats.
- Continue editing- In Quick / In Expert: Choose where you would like to proceed working on the epitome - in Quick mode or Good mode.
- Share- Flickr / Twitter: Choose to identify your image online through one of the social or sharing services available in Photoshop Elements.
Scratches and Blemishes guided edit
Employ the Scratch and Blemishes to fix (big or pocket-sized) flaws in an image (using the Healing Brush or the Spot Healing Brush).
Y'all can view the afterwards image only, or view both the before and after images either vertically or horizontally.
For more on correcting color casts, meet Set up large imperfections or Remove spots and small imperfections.
Text and Edge Overlay guided edit
Introduced in Photoshop Elements 2019
Add stylish borders to your photos with text that speak your story. Use the Text and Edge Overlay guided edit to give a neat new expect to your photo with a combination of polished borders and text.
-
Exercise i of the following:
- Open a photograph in Photoshop Elements.
- Select a photo from the Photo Bin.
- Open a photograph in Photoshop Elements.
-
Select Guided > Special Edits > Text and Border Overlay.
-
Click Select a Edge and choose a border from the available options.

Unlike border styles. -
Drag the Resize Border slider to increase or subtract the size of the border.
-
Click the Color Picker button, and then click the colour you desire to apply on the border.
-
Click Add Text Overlay. A text frame appears over the edge and the Type Tool becomes active.
-
Blazon in the new text. You can change the font, size, color, and style of the text from the Tool Options bar in the Guided workspace. When yous are washed typing, click the dark-green bank check marking (
 ) to commit your changes.
-
Change the position of the text by clicking a dot on the edge.

Change the position of text past clicking on a dot. -
Click the Text Mode button to brandish preconfigured text styles that yous tin apply on the text. Click on a text style to apply it on the text. Y'all can revert to your original text style by clicking the Reset (
 ) button.
-
Subsequently y'all get the desired result, click Next to cull how y'all would like to continue:
- Save - Salve / Salve As: Preserve the newly-created image in any of the bachelor formats.
- Continue editing- In Quick / In Expert: Choose where you would similar to proceed working on the paradigm - in Quick manner or Expert style.
- Share- Flickr / Twitter: Choose to place your epitome online through ane of the social or sharing services available in Photoshop Elements.
Tilt-Shift guided edit
Use the tilt-shift effect to focus attention on certain aspect or object in your photo, while selectively taking focus abroad from other things in your photograph. The tilt-shift outcome also causes a pseudo-miniature effect to be formed on the photo.

-
Open a photo, and in the Guided Edits panel click Photo Effects > Tilt-Shift.
-
Click Add Tilt-Shift to apply the bones issue to the photo. The photo appears blurred out.
-
Click Change Focus Area and and then click and drag across the prototype to specify the areas that you would like to appear in sharp focus.
-
To experiment with more effects, click Refine Consequence and modify:
-
Blur: Increment the intensity of blur applied to the photo.
-
Contrast: Increases or decreases the contrast levels of the photo.
-
Saturation: Increases or decreases the color saturation levels of the photograph
-
-
After you lot get the desired event, click Next to cull how you would like to proceed:
- Save - Save / Relieve As: Preserve the newly-created image in any of the available formats.
- Go along editing- In Quick / In Expert: Choose where you would like to proceed working on the image - in Quick style or Expert mode.
- Share- Flickr / Twitter: Choose to place your epitome online through one of the social or sharing services bachelor in Photoshop Elements.
Watercolor Upshot guided edit
Utilise the Watercolor Effect guided edit to add watercolor effect to your photos with texture and text effects.
-
Do one of the following:
- Open a photograph in Photoshop Elements.
- Select a photo in the Photograph Bin.
-
Cull Guided > Special Edits > Watercolor Result.
-
Select a watercolor result from the bachelor options.
-
Choose a watercolor newspaper. You can accommodate the opacity of the paper.
-
Choose a texture for the sail. You can conform the intensity of the texture.
-
(Optional) Adjust the details using the Refine Effect Brush. This tool helps you add or remove effect to and from the surface area you pigment over with the brush.
-
(Optional) Click Type Tool to add text. Click anywhere on the photograph, and then blazon your text. Yous tin change the font, size, and mode of the text from the Tool Options bar in the Guided workspace. When you are washed typing, click the dark-green check mark to utilise your changes.
For more information near adding text, see Add together text.
-
(Optional) Apply style to the text from the available options. You can choose Advanced options to utilise further changes in the result. For more information on accelerate options, encounter Nearly layer styles.
-
After you get the desired result, click Adjacent to cull how you would like to keep:
- Relieve - Save/Save Every bit: Preserve the newly-created image in whatever of the bachelor formats.
- Go on editing - In Quick/In Expert: Choose where y'all would like to keep working on the image - in Quick mode or Expert style.
- Share - Flickr/Twitter: You can upload your image online through one of the social or sharing services available in Photoshop Elements
Source: https://helpx.adobe.com/photoshop-elements/using/guided-mode-special.html
Posted by: rachalamoved.blogspot.com

0 Response to "How To Dramatize Clouds In Photoshop Elements 19"
Post a Comment